Are you tired of a leaky shower causing damage to your plywood floor? Or maybe you’re a DIY enthusiast looking to tackle a new project? Well, look no further! In this guide, we will walk you through the step-by-step process of building a shower pan on a plywood floor. By the end, you’ll have the knowledge and confidence to create a waterproof and durable shower base that will stand the test of time.
Building a shower pan on a plywood floor may seem like a daunting task, but with the right guidance and a little bit of patience, it can be a rewarding and satisfying project. Whether you’re a seasoned DIY-er or a beginner, this comprehensive guide will provide you with all the necessary information and tips to successfully complete the project. From preparing the plywood floor to installing the shower liner and creating a watertight seal, we’ve got you covered. So, let’s dive in and get started on creating the shower of your dreams!
- Measure and mark the shower pan area on the plywood floor.
- Install a waterproof membrane over the plywood to prevent water damage.
- Create a sloping base using mortar or pre-sloped shower pans.
- Secure the shower drain to the plywood floor and connect it to the plumbing.
- Apply a layer of mortar mix or a waterproofing membrane over the sloping base.
- Install the shower pan liner and ensure it is properly sealed and sloped towards the drain.
- Pour a final layer of mortar mix and smooth it out to create a level surface.
- Allow the mortar to dry and cure before tiling or installing the shower floor.

How to Build a Shower Pan on Plywood Floor
Building a shower pan on a plywood floor is a great way to create a waterproof base for your shower. Whether you’re renovating your bathroom or building a new one, this step-by-step guide will help you through the process. By following these instructions, you can ensure a durable and leak-free shower pan that will stand the test of time.
Step 1: Measure and Plan
The first step in building a shower pan on a plywood floor is to measure the area where the shower will be installed. Take accurate measurements of the length, width, and depth required for your shower pan. Use these measurements to calculate the amount of materials you will need, such as plywood, cement board, and waterproof membrane.
Next, plan the layout of your shower pan. Consider the location of the drain, the slope of the floor, and the positioning of any walls or barriers. It’s important to ensure that the shower pan will be level and properly sloped towards the drain to prevent water pooling or leaking.
Step 2: Prepare the Plywood Floor
Before installing the shower pan, it’s crucial to prepare the plywood floor properly. Start by removing any existing flooring materials, such as tiles or vinyl. Inspect the plywood for any signs of damage or rot. Replace any damaged sections to ensure a solid foundation for the shower pan.
Once the plywood is in good condition, clean the surface thoroughly and remove any dust or debris. Apply a layer of primer to the plywood to improve adhesion. Allow the primer to dry completely before proceeding to the next step.
Step 3: Install Cement Board

After preparing the plywood floor, it’s time to install cement board. Cut the cement board to fit the dimensions of your shower pan using a circular saw or a scoring knife. Place the cement board on top of the plywood, ensuring a tight fit and leaving a small gap between the boards for expansion.
Secure the cement board to the plywood using screws or nails, making sure to drive them into the studs for added stability. Check for any loose or raised areas and fix them by adding more screws or nails. Once the cement board is securely fastened, use a trowel to apply thin-set mortar over the seams and screw heads. Allow the mortar to dry according to the manufacturer’s instructions.
Step 4: Apply Waterproof Membrane
To make the shower pan waterproof, it’s essential to apply a waterproof membrane. There are various types of waterproofing systems available, such as sheet membranes or liquid membranes. Follow the manufacturer’s instructions to apply the waterproof membrane to the cement board, ensuring complete coverage.
Pay extra attention to the corners, seams, and areas around the drain. Use a brush or a roller to apply the membrane evenly, and be sure to overlap the edges for a watertight seal. Once the membrane is applied, allow it to dry completely before proceeding to the next step.
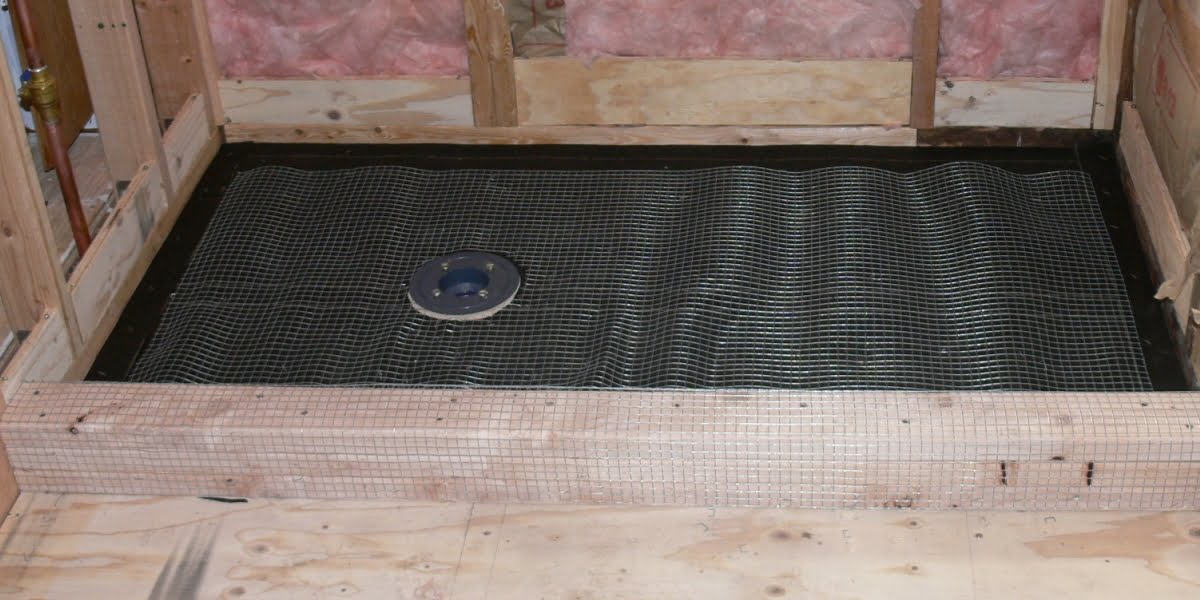
Step 5: Install the Drain and Test
Now it’s time to install the drain in the shower pan. Follow the manufacturer’s instructions to properly position and secure the drain assembly. Make sure it is level and tightly sealed to prevent any leaks. Test the drain by pouring water into the shower pan and checking for any signs of leakage.
If there are no leaks, you can proceed with the rest of your shower installation, such as tiling the walls and floor, installing fixtures, and sealing the joints. With a properly built shower pan on a plywood floor, you can enjoy a functional and beautiful shower for years to come.
Frequently Asked Questions
Here are some commonly asked questions about building a shower pan on a plywood floor:
Q: Can I install a shower pan directly on a plywood floor?
A: No, it is not recommended to install a shower pan directly on a plywood floor. Plywood is not waterproof and can deteriorate over time when exposed to moisture. To properly build a shower pan, you’ll need to create a waterproof barrier between the plywood and the shower pan material.
One common method is to install a layer of cement backer board over the plywood floor. This backer board is moisture-resistant and provides a stable surface for the shower pan. Make sure to follow the manufacturer’s instructions for installing the backer board and properly seal any seams or joints.
Q: How do I build a shower pan on a plywood floor?
A: To build a shower pan on a plywood floor, you’ll need to follow these steps:
- Prepare the plywood floor by ensuring it is clean, dry, and level.
- Install a layer of cement backer board over the plywood. Use screws to secure the backer board to the plywood, making sure to leave a small gap between each panel for expansion.
- Apply a waterproofing membrane over the backer board, following the manufacturer’s instructions. This will create a barrier to prevent water from seeping into the plywood.
- Create a sloped mortar bed on top of the waterproofing membrane. This will ensure proper drainage in the shower pan.
- Install the shower pan material, such as a pre-formed fiberglass or acrylic pan, following the manufacturer’s instructions. Make sure to properly seal any seams or joints to maintain a watertight barrier.
Q: How long does it take to build a shower pan on a plywood floor?
A: The time it takes to build a shower pan on a plywood floor can vary depending on your skill level and the complexity of the project. On average, it may take a few days to complete the entire process.
Factors that can affect the timeline include the preparation of the plywood floor, the installation of the cement backer board and waterproofing membrane, and the curing time of any mortar or adhesive used. It’s important to allow sufficient time for each step to ensure a proper and long-lasting installation.
Q: What tools and materials do I need to build a shower pan on a plywood floor?
A: To build a shower pan on a plywood floor, you’ll need the following tools and materials:
- Plywood floor
- Cement backer board
- Screws
- Waterproofing membrane
- Mortar mix
- Trowel
- Shower pan material (e.g., fiberglass or acrylic pan)
- Sealant
- Tile or other desired flooring material
- Grout
- Tile or flooring installation tools
Make sure to have the necessary safety equipment, such as gloves and goggles, when working with these materials.
Q: Can I install tile directly on a plywood shower pan?
A: It is not recommended to install tile directly on a plywood shower pan. Plywood is not a suitable surface for tile installation as it can flex and shift, causing the tile and grout to crack over time.
Instead, you should follow the steps mentioned earlier to create a waterproof barrier using cement backer board and a waterproofing membrane. Once the waterproofing is in place, you can then install tile on top of the backer board using a suitable thinset mortar and grout.
Remember, it is essential to choose the right materials and tools, such as a waterproof membrane and a mortar mix suitable for wet areas. Taking the time to properly prepare the plywood surface, ensuring it is level and free from any imperfections, will greatly contribute to the success of your shower pan installation. Finally, following the recommended curing times and allowing the mortar to fully set before proceeding with tiling or other finishing touches is crucial for a durable and leak-free shower.
With the knowledge gained from this guide, you can confidently embark on the journey of building a shower pan on a plywood floor. So, roll up your sleeves, gather your supplies, and get ready to create a beautiful and functional shower space that you can enjoy for years to come. Happy building!
- How to Remove Glue From Wood Floor - April 14, 2024
- How to Dissolve Wood Glue - April 14, 2024
- How to Remove Wood Glue - April 14, 2024